JavaScript SDK
pandadoc.js
Overview
Our JavaScript-based Software Developer Kit puts the power of PandaDoc at your fingertips with pandadoc.js. In a few simple steps, you can integrate PandaDoc into your own web-based application, allowing your users to create and send documents straight from your company's website.
You don't need to be a beard-stroking JavaScript guru to use PandaDoc's JavaScript SDK because we've already done the hard parts for you! You’ll need just a few lines of JavaScript to setup the full-featured integration.
Classes
There are two main classes representing the two primary functionalities of pandadoc.js:
| Class Name | Description | Features |
|---|---|---|
PandaDoc.DocList | List PandaDoc Documents | List all account documents or filter the list view to a specific list of documents with document metadata. |
PandaDoc.DocEditor | Edit PandaDoc Documents in a page element or as a modal. | Edit a new or existing PandaDoc document from a page element or modal window. Merge data from your application directly into the document editor. |
Authentication
pandadoc.js uses active PandaDoc application sessions to authenticate users. If a user is logged-in to app.pandadoc.com, pandadoc.js will recognize and use this active session. If a user is not authenticated, they will see a message requesting log-in to PandaDoc on first use. It is possible to create a new account from this pandadoc.js SDK view as well.
Version
| Script | Version |
|---|---|
pandadoc.js | 0.2.20 |
You can specify latest instead of 0.2.20 to always use the latest version.
HTML View Template
<!DOCTYPE html>
<html lang="en">
<head>
    <meta charset="UTF-8">
    <title>PandaDoc JavaScript SDK</title>
    <script src="https://pd-js-sdk.s3.amazonaws.com/0.2.20/pandadoc-js-sdk.min.js"></script>
    <link rel="stylesheet" href="https://pd-js-sdk.s3.amazonaws.com/0.2.20/pandadoc-js-sdk.css"/>
    <style>
        .pandadoc iframe {
            width: 900px;
            height: 700px;
        }
    </style>
</head>
<body>

<div id="pandadoc-sdk" class="pandadoc"></div>

<script>
    // SDK Javascript Here
    // PandaDoc.DocList or PandaDoc.DocEditor
</script>

</body>
</html>
Document List View
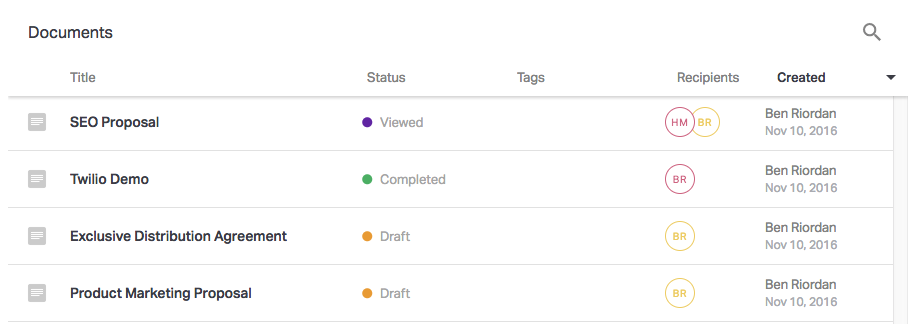
pandadoc.js provides two main functional elements to your apps. Document lists, and a document editor. First, we'll discuss PandaDoc.DocList which renders a list of documents to a web view. With this document list, you can show a list of related documents to record(s) in your systems. For example, a list of documents related to an opportunity, a support ticket or any other records that associates with documents.

Click to Enlarge: 'PandaDoc.DocList' method renders a list of documents.
Document List Implementation
The code examples below initialize and show a list of documents from the active PandaDoc user. Place the code within a <script> tag of your HTML page view.
var doclist = new PandaDoc.DocList({mode: PandaDoc.DOC_LIST_MODE.LIST});
doclist.init({
    el: '#ELEMENT_ID',
    data: {
        metadata: {
            YOUR_META_KEY: 'YOUR_META_VALUE'
        }
    },
    cssClass: 'CUSTOM_CSS_CLASS',
    events: {
        onInit: function(){},
        onDocumentCreate: function(){}
    }
});
Document List Code Discussion
* denotes a required parameter.
| * | Attribute: Example | Description |
|---|---|---|
| * | el: '#pandadoc-list' | Enter the HTML element ID where DocList should render. |
metadata: { my_favorite_pet: 'Panda', salesforce_opp_id: 123456 } | To filter documents related to a record or view in your app, you need to both pass and consume metadata. For example, if you want to show documents only related to your favorite pet you could do so. This is an arbitrary key-value store. | |
cssClass: 'style-me' | Enter the html element class DocList should use for styles. | |
events: { onInit: function(){ alert('DocList Loaded!'); }, onDocumentCreate: function() { window.location.pathname= "/thank-you"; } } | Respond to document events in the browser by registering an 'event handler' function. In this example "DocList Loaded!" will appear when loading is complete. The path /thank-you will be redirected to on completion. |
Document Editor View
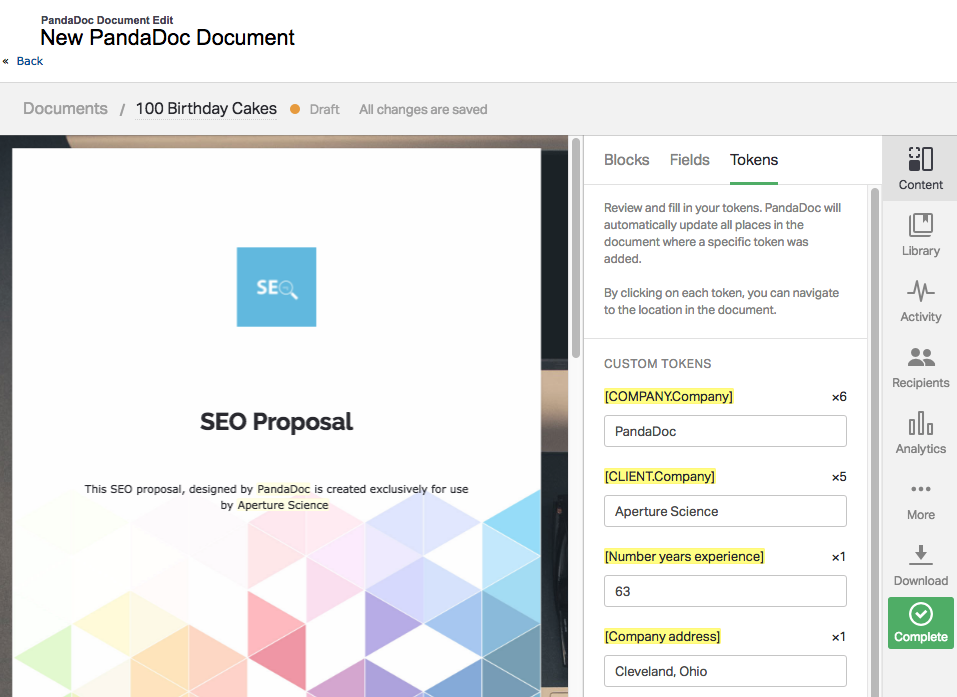
Showing related documents in your app is a really useful feature. If you would like to truly automate document management, you can create and send documents within your application via PandaDoc too. A PandaDoc editor can be opened in a modal view or you can embed it into a page element. Here is an example.

PandaDoc SDK PandaDoc.DocEditor
Passing Data to PandaDoc.DocEditor
You have an option to pass some data to a document when it's being created with the PandaDoc Editor. Here is list of what can be merged into a new document. We'll further breakdown the format of each in Document Editor Code Discussion below.
- Recipients (including roles assignment for templates)
- Token information
- Field information
- Products to a pricing table
- Products to Quote Builder
- Meta key value information
If you have several pricing tables, all items go to all tables by default. You need to enable merge rules to pass only certain items to certain tables.
Document Editor Implementation
The two code examples below initialize and show a PandaDoc document editor. It has templates available from the active PandaDoc user session. Place the code within a <script> tag of your HTML page view.
Modal vs Inline DocEditor ViewTake a look at line 2,
editor.show({in either script tab below.
- Use the
editor.showAsModal()function to loadDocEditoras a modal overlay.- Alternatively, use
editor.show()to loadDocEditordirectly into a page view.
var editor = new PandaDoc.DocEditor();
editor.show({
    el: '#ELEMENT_ID',
    data: {
        metadata: {
            YOUR_META_KEY: 'YOUR_META_VALUE'
        }
    },
    cssClass: 'CUSTOM_CSS_CLASS',
    events: {
        onInit: function(){},
        onDocumentCreated: function(){},
        onDocumentSent: function(){},
        onClose: function(){}
    }
});
var editor = new PandaDoc.DocEditor();
editor.show({
el: '#ELEMENT_ID',
data: {
docName: 'Document Name',
recipients: [{
first_name: "John",
last_name: "Appleseed",
email: "[email protected]",
title: "Dr.",
phone: "+1 415-012-3456",
company: "Sample Company",
country: "USA",
postal_code: "90210",
state: "CA",
city: "Anytown",
street_address: "123 Main Street",
//will be automatically assigned to a specific role in a template
roleName: "ROLE_IN_A_TEMPLATE"
}],
//populate fields in a template
widgets: {
FIELD_TITLE: 'FIELD_DATA'
},
//populate tokens in a template
tokens: {
TOKEN_NAME: 'TOKEN_VALUE',
},
//populate a pricing table in a template
items: [{
sku: 'A1234',
name: 'Sample Product',
price: 100,
qty: 1,
description: 'Description of a product',
currency: 'USD',
custom_fields: {
location : 'California'
}
}],
metadata: {
YOUR_META_KEY: 'YOUR_META_VALUE'
}
},
cssClass: 'CUSTOM_CSS_CLASS',
events: {
onInit: function(){},
onDocumentCreated: function(){},
onDocumentSent: function(){},
onClose: function(){}
}
});Document Editor Code Discussion
This table discusses the DocEditor Full Init code example above. To follow along, make sure you have clicked on this second tab to reveal the additional full-featured example script.
* denotes a required parameter.
| * | Attribute: Example | Description |
|---|---|---|
| * | el: '#pandadoc-editor' | Enter the HTML element ID where DocEditor should render. |
| * | docName: 'Document Name' | The template that the user selects will be turned into a document with this name. |
jsx<br/>recipients: [{<br/> first_name: "John",<br/> last_name: "Appleseed",<br/> email: "[email protected]",<br/> phone: "+1 415-012-3456",<br/> company: "Sample Company",<br/> roleName: "Client",<br/> default: true<br/>}]<br/> | This is an array of one or more recipient objects. - The following parameters are required: first_name, last_name, email. All other parameters in the recipient object are optional.- roleName assigns the recipient to all template fields with the matching role. If your template does not have a role assigned to all fields, the default parameter can be set as true to assign these unassigned fields to the recipient by default. default can only be true for one recipient object in the recipient array. | |
jsx<br/>widgets: {<br/> my_field_title: 'data',<br/> favorite_plant: 'bamboo'<br/>}<br/> | This object is for pre-filling document fields. With this SDK version, the legacy name widgets is still used to pertain to document fields. | |
jsx<br/>tokens: {<br/> my_token_title: 'data',<br/> favorite_plant: 'bamboo'<br/>}<br/> | Similar to fields, this object is for populating token values when creating a document from a PandaDoc template. | |
jsx<br/>items: [{<br/> isSection: true,<br/> name: "Custom section"<br/>},<br/>{<br/> sku: 'A1234',<br/> name: 'Sample Product',<br/> price: 100,<br/> qty: 1,<br/> description: 'Description of a product',<br/> currency: 'USD',<br/> discount: { value: 10, global: false, type: 'percent' },<br/> tax_first: { value: 1, global: false, type: 'percent' },<br/> tax_second: { value: 1, global: false, type: 'percent' },<br/> custom_fields: {<br/> location: 'California'<br/> }<br/>}]<br/> | The items array is for inserting one or more items into a document pricing table. There are a few gotchas to look out for here:- Make sure the option "Automatically add products to this table" is enabled for template table. - Make sure the option "Line item tax and Line item discount" is enabled for template table. - If you have additional custom columns in your pricing table, select the column in your template and check "Map column to custom field". This maps the custom pricing table column to the key name in the optional custom_fields object in this example.- Next format for digital is supported: Maximum 20 integer places and maximum 10 decimal places. | |
jsx<br/>metadata: {<br/> my_favorite_pet: 'Panda',<br/> salesforce_opp_id: 123456<br/>}<br/> | To filter documents related to a record or view in your app, you need to both pass and consume metadata. For example, if you want to show documents only related to your favorite pet you could do so. This is an arbitrary key-value store. | |
cssClass: 'style-me' | Enter the html element class DocEditor should use for styles. | |
jsx<br/>events: {<br/> onInit: function(){<br/> alert('DocList Loaded!');<br/> },<br/> onDocumentCreate: function() {<br/> window.location.pathname="/thank-you";<br/> },<br/> onDocumentSent: function(){<br/> alert('Document Sent!');<br/> },<br/> onClose: function(){<br/> console.log('Editor Modal Closed!');<br/> }<br/>}<br/> | Respond to document events in the browser by registering an 'event handler' function. In this example "DocEditor Loaded!" will appear when loading is complete. The path /thank-you will be redirected to on completion. There are two additional events for editing documents as compared to the document list: onDocumentSent and onClose. |
Updated 3 months ago
