
Getting Started with MCP
Connecting PandaDoc MCP is quick: pick the server URL for your region, add the PandaDoc MCP server to your AI tool, and start giving it natural language instructions.
This guide shows you how to connect the PandaDoc MCP server to your agentic AI tool so that agents can read, create, and update your PandaDoc documents and templates.
Before you start, make sure you have:
- A PandaDoc account, and the region it belongs to (global or European).
- One of the supported MCP clients installed.
To get started:
Choose your MCP server URL
The PandaDoc MCP server is available in two regions. Use the URL that matches the region your PandaDoc account is hosted in:
| Region | MCP server URL |
|---|---|
| Global | https://mcp.pandadoc.com/v1/mcp |
| European (pandadoc.EU) | https://mcp.pandadoc.eu/v1/mcp |
If you sign in at app.pandadoc.eu, your account is in the European region and you must use the mcp.pandadoc.eu URL. Authentication fails if the region of the server URL doesn't match the region of your account, and each server returns only the documents and templates stored in its own region.
The steps below use the global URL. If your account is in the European region, substitute https://mcp.pandadoc.eu/v1/mcp wherever the global URL appears.
There is no PandaDoc connector in the Claude connector directory for the European region. The listing you find by searching "PandaDoc" in Claude connects to the global server only, so an account on app.pandadoc.eu can't authenticate through it. In Claude Desktop, add PandaDoc as a custom connector with the
https://mcp.pandadoc.eu/v1/mcpURL instead. See the Claude Desktop tab below for the steps.
Set up the PandaDoc MCP server
To set up the remote PandaDoc MCP server, follow the steps for your client. PandaDoc provides instructions for several common clients:
How you add PandaDoc in Claude Desktop depends on your region:
- Global accounts (app.pandadoc.com): install the PandaDoc connector from the Claude connector directory.
- European accounts (app.pandadoc.eu): the PandaDoc connector is not published in the Claude connector directory for the European region. The directory listing points to the global server, so it can't authenticate an EU account — add PandaDoc as a custom connector instead.
Global region: install from the connector directory
-
Open Claude Desktop, go to "Customize" -> "Connectors", and click Browse.
-
Type "PandaDoc" in the search input.
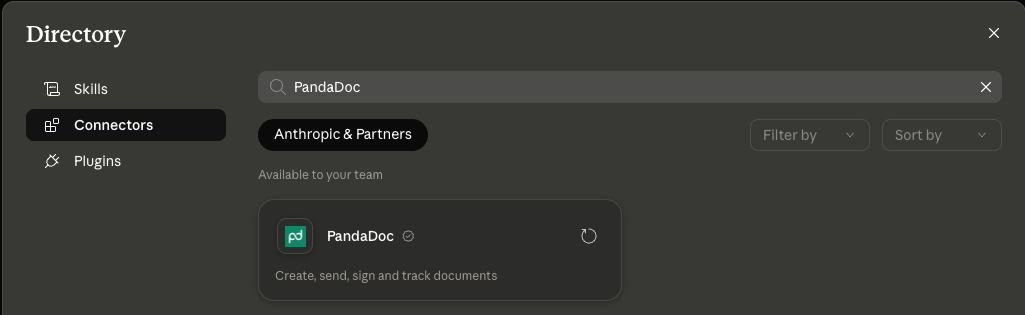
-
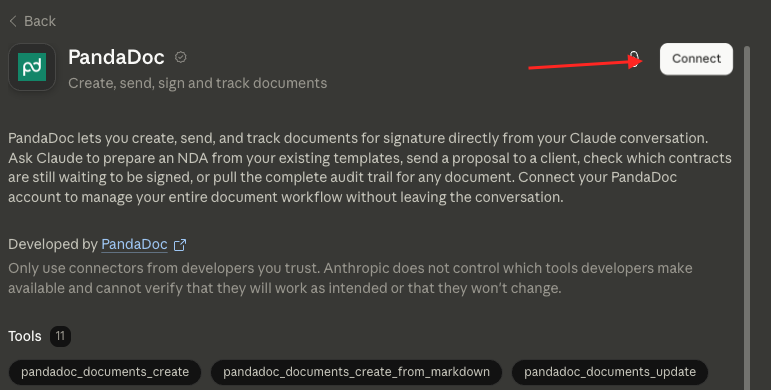
Click the PandaDoc box, then click Connect to begin the authentication process. An external page opens.
-
Click Allow access to consent and begin the authentication process with PandaDoc.
-
Click Authorize to authenticate and allow Claude to access your PandaDoc account.
-
When authentication finishes, an alert appears. Click Open Claude to return to Claude Desktop.
-
PandaDoc now appears under your connectors, and you're ready to start prompting in Claude.
European region: add a custom connector
Do not install the PandaDoc listing from the directory — it connects to the global server and your EU credentials are rejected.
- Open Claude Desktop and go to "Customize" -> "Connectors".
- Click Add custom connector.
- Enter a name, for example "PandaDoc EU".
- Enter the remote MCP server URL:
https://mcp.pandadoc.eu/v1/mcp - Click Add.
- Click Connect next to the new connector to begin the authentication process. An external page opens.
- Click Allow access to consent and begin the authentication process with PandaDoc.
- Click Authorize to authenticate and allow Claude to access your PandaDoc account.
- When authentication finishes, an alert appears. Click Open Claude to return to Claude Desktop.
- Your custom PandaDoc connector now appears under your connectors, and you're ready to start prompting in Claude.
To set up the PandaDoc MCP server in Claude Code:
- Open your terminal, run the following command, then press Enter:
claude mcp add pandadoc --transport http https://mcp.pandadoc.com/v1/mcpFor the European region, run:
claude mcp add pandadoc --transport http https://mcp.pandadoc.eu/v1/mcp- Type
claudeto start Claude Code. - Type
/mcpand press Enter to open the list of MCP servers you have installed. - Use the arrow keys to navigate to the PandaDoc server and press Enter to begin the authentication process. An external page opens.
- Click Allow access to consent and begin the authentication process with PandaDoc.
- Click Authorize to authenticate and allow Claude Code to access your PandaDoc account.
- When authentication finishes, return to the terminal and enter the
/mcpcommand again. - The PandaDoc server now displays as connected, and you're ready to start prompting in Claude Code.
To set up the PandaDoc MCP server in OpenCode:
- Open your terminal and run the following command:
opencode mcp add- Press Enter to start the process.
- When OpenCode asks for the MCP server name, type "pandadoc" and press Enter.
- When OpenCode asks for the MCP server type, use the arrow keys to select "Remote" and press Enter.
- When OpenCode asks for the MCP server URL, type
https://mcp.pandadoc.com/v1/mcp(European region:https://mcp.pandadoc.eu/v1/mcp) and press Enter. - When OpenCode asks whether the server requires OAuth authentication, use the arrow keys to select "Yes" and press Enter.
- When OpenCode asks "Do you have a pre-registered client ID?", use the arrow keys to select "No" and press Enter.
- OpenCode ends with the message "MCP server added successfully".
- Authenticate with your PandaDoc account by running the following command:
opencode mcp auth pandadoc- Press Enter to begin the authentication process. An external page opens.
- Click Allow access to consent and begin the authentication process with PandaDoc.
- Click Authorize to authenticate and allow OpenCode to access your PandaDoc account.
- When authentication finishes, return to the terminal and start OpenCode with the command
opencode. - Inside OpenCode, type
/mcpin the prompt and press Enter. - "pandadoc" is listed as "connected".
- Press ESC, and you're ready to start prompting in OpenCode.
To set up the PandaDoc MCP server in Codex desktop:
- Open Codex and click "Settings -> Settings" in the lower left corner.
- In the settings view, select "MCP servers".
- In the MCP servers listing, select "+ Add server".
- On the "Connect to a custom MCP" screen, enter:
- Name: PandaDoc
- Select "Streamable HTTP"
- URL:
https://mcp.pandadoc.com/v1/mcp(European region:https://mcp.pandadoc.eu/v1/mcp) - Save
- Back in the MCP servers list, an Authenticate button appears next to the settings gear icon. Click it to begin the authentication process. An external page opens.
- Click Allow access to consent and begin the authentication process with PandaDoc.
- Click Authorize to authenticate and allow Codex to access your PandaDoc account.
- When authentication finishes, return to the Codex window, and you're ready to start prompting in Codex.
To set up the PandaDoc MCP server in Cursor:
- Open the command palette.
- On macOS:
CMD + Shift + P - On Windows/Linux:
CTRL + Shift + P
- In the list that appears, select "View: Open MCP Settings" and press Enter.
- Select "Tools & MCPs".
- Under "Installed MCP Servers", click the New MCP Server button.
- An
mcp.jsonfile opens. Add the PandaDoc MCP server inside the "mcpServers" object. It should look like this:
{
  "mcpServers": {
    "pandadoc": {
      "url": "https://mcp.pandadoc.com/v1/mcp"
    }
  }
}
For an account in the European region, use the mcp.pandadoc.eu URL instead:
{
  "mcpServers": {
    "pandadoc": {
      "url": "https://mcp.pandadoc.eu/v1/mcp"
    }
  }
}
Note: if you already had an MCP server configured, make sure the commas are in the right place, for example:
{
  "mcpServers": {
    "mcp-sample-server": {
      "url": "https://mcp.sample.server.com/mcp"
    },
    "pandadoc": {
      "url": "https://mcp.pandadoc.com/v1/mcp"
    }
  }
}- Save the file and go back to the "Tools & MCPs" screen.
- An Authenticate button appears. Click it to begin the authentication process. An external page opens.
- Click Allow access to consent and begin the authentication process with PandaDoc.
- Click Authorize to authenticate and allow Cursor to access your PandaDoc account.
- When authentication finishes, return to Cursor, and you're ready to start prompting.
To set up the PandaDoc MCP server in VS Code:
- Make sure you have GitHub Copilot enabled.
- Open the command palette and select MCP: Add server...
- On macOS:
CMD + Shift + P - On Windows/Linux:
CTRL + Shift + P
- Select HTTP.
- Paste the server URL
https://mcp.pandadoc.com/v1/mcp(European region:https://mcp.pandadoc.eu/v1/mcp) in the search bar, then press Enter. - Type "PandaDoc" when it asks for a server ID, then press Enter.
- Your
mcp.jsonfile opens with the PandaDoc MCP server configuration. - VS Code prompts you to allow authentication. Click Allow.
- Another alert with a URL appears. Click Open to begin the authentication process. An external page opens.
- Click Allow access to consent and begin the authentication process with PandaDoc.
- Click Authorize to authenticate and allow VS Code to access your PandaDoc account.
- When authentication finishes, return to VS Code, and you're ready to start prompting.
Instructions vary by client. For clients not listed here, check the supported MCP clients page or your client's own documentation on how to add a remote MCP server.
If the server doesn't connect or authentication fails, see MCP troubleshooting.
Start using the PandaDoc MCP server
To confirm the connection works, ask your client for something that requires your PandaDoc account, for example: "List my 5 most recently created PandaDoc documents." If the client returns your documents, the server is connected and authenticated.
Here are some example prompts to get you started:
| Use Case | Example Instruction |
|---|---|
| Create documents | "Create a new contract from the Master Services Agreement template for Acme Corp with a $50,000 contract value." |
| Track status | "Find all documents currently waiting for signatures, showing recipient names and how long they've been pending." |
| Send reminders | "Send reminder emails to all recipients who haven't signed in the last 7 days." |
| Search & filter | "Show me all contracts worth more than $100,000 that were signed last quarter." |
| Analytics | "Create a report showing document completion rates by month and average signing time." |
See the full Prompt Library for more categories and examples.
Updated 2 months ago